


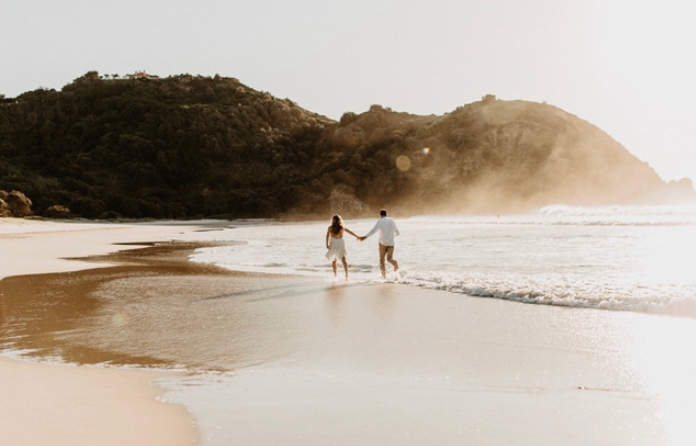
Handing a camera over to a non-photographer friend can be a mildly anxiety-inducing experience for them. It’s kind of like witnessing someone who has little experience with children holding a baby. They hold them away from their body, looking at them like a foreign creature, nervously hoping they don’t start to cry. As with a camera, they don’t quite know how to handle them. They’re both heavier than they look, extremely precious, and replete with indiscernible needs.
Getting your camera to work for you requires time, attention, and practice. Many of the newer DSLRs have about a million functions that do a million different things, and it can feel like a long and daunting road towards complete mastery. In fact, most people who buy DSLRs never actually figure out how to use them properly. If you ask us. it’s a bit of a shame having such a well-oiled machine at your fingertips and only scratch the surface of what it’s capable of. If you’re keen to learn how your camera works and see the world of photography open up to you as a result, dig your teeth into this, the beginner's photography guide. We’ll lead you through one of the most difficult phases of photography and help you to understand the mechanics of that beautiful piece of technology in your possession. From the basics of exposure, aperture, and ISO, to getting colours to appear true to life by knowing the processes behind white balance, you’ll be a photography wizard in no time.
Exposure
Let’s start with exposure. For those of you only just emerging from underneath the rock you’ve lived under for the past few years, exposure is the amount of light captured by the image sensor of the camera. It’s a measure of how bright or dark your image will be.
Technically, a correct and perfect exposure exists. There are rules about exposing your highlights and shadows just so in order to get the most out of the details in your photograph. Overexposure means blown-out highlights and midtones, and underexposure causes your shadows to be reduced to pure black, devoid of any information or texture. But we only learn the rules to break em, right? Before you rebels get too excited about setting rules alight, let’s get the basics down.
To arrive at the perfect exposure, there are three major vectors at play: aperture, shutter speed, and ISO. The balance we strike between these three factors allows us the freedom to translate our artistic genius into imagery.
If you’re reading this and thinking, “this would be a helluva lot better with a picture to illustrate what you mean!” we’ve got the hookup.
Behold, the exposure triangle:
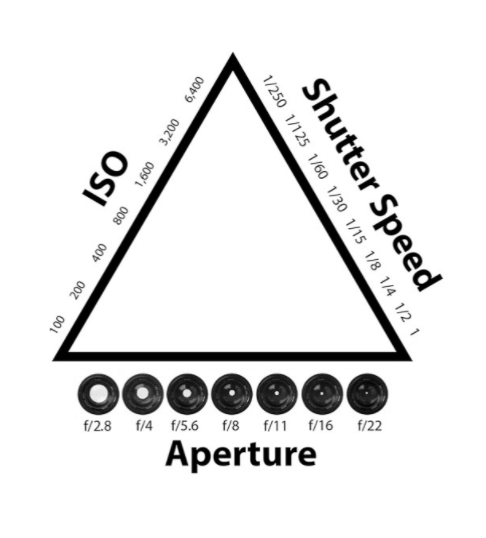
As you can see, ISO, aperture, and shutter speed make up the three sides of the triangle. In balance, they contribute to a well-exposed photograph. In a really rudimentary sense, it’s like making pancakes. There’s a perfect combination of flour, egg, and milk. If you add too much flour, you have to balance it out with more milk. Too watery? Add another scoop of flour! With an image, if you let more light in by widening the aperture, you have to balance it out with a fast shutter speed. If you modify the light sensitivity of the sensor by increasing the ISO, you’ll have to shut down the aperture or speed up the shutter. There are always a few different ways to arrive at the correct exposure (and probably less ways to arrive at the ideal pancake). We’ll be the first to admit that the analogy isn’t perfect. But it’s a start! Just remember that in order to maintain the correct exposure, if you adjust one variable, at least one of the others has to be adjusted as well. Each of these variables are measured in stops.
What is a 'stop'?
You’ve probably heard the word ‘stop’ used in a photographic context a few times. But with aperture being referred to as ‘f-stop,’ and hearing ‘stop’ apply to ISO and shutter speed as well, it can get a little bit confusing to keep track of it all (especially when there’s a mountain of new stuff to learn all the time)! But basically, a stop is a measure of exposure relating to the doubling or halving of the amount of light. If your photo is a little dark, adding a stop, or doubling the amount of light will brighten the image. And if the opposite is true, where your image is a bit too bright, decreasing your exposure by one stop (or halving the amount of light) will darken it.
The importance of light in a photograph is undeniable, and the creative control you exercise by how much light you let in through ISO, shutter speed, and aperture determine SO many things about how you present your subject. Do you want your background to be soft or in focus? Is your subject frozen in motion or is there a blur to their movement? There’s a trade-off when you change one to compensate for another. Read on to dig a little deeper into what each of these things do.
Aperture
When you look at the aperture, it’s important to consider the hole picture. And the whole picture. Aperture refers to the size of the lens opening. The bigger the hole, the more light hits the sensor. The smaller the hole, the less light that hits the sensor. Depending on the size of the hole, more or less of the image is in focus. Sick of the word ‘hole’ yet? We’re almost done.
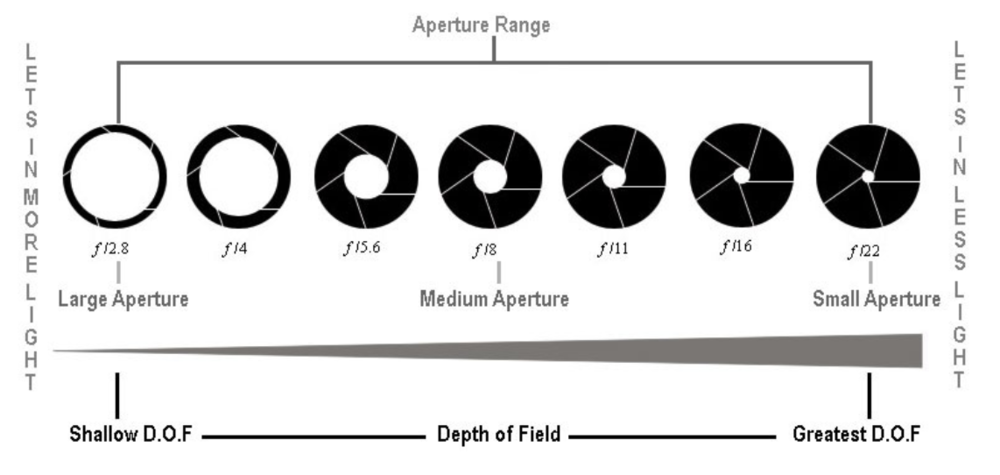
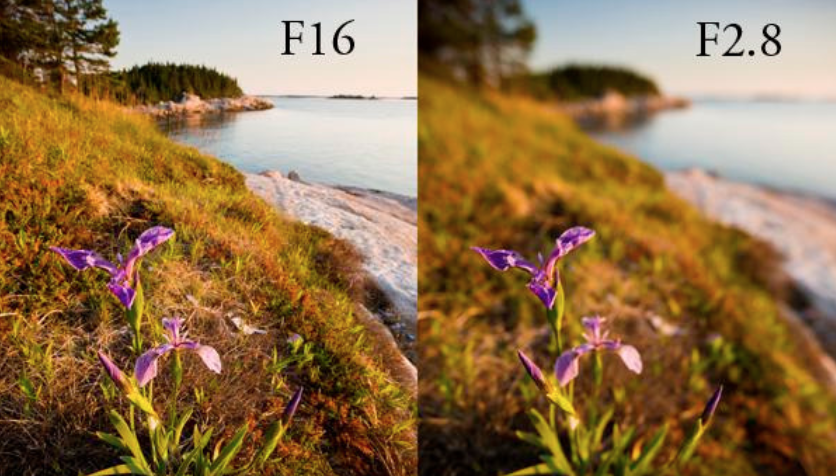
Chasin’ that dreamy, glowy, soft focus kind of portrait? Open up the aperture to f/2.8. Shooting in a landscape where you want to show as much of the beautiful background as possible? Close the aperture down a bit, shoot at f/22. Aperture is essential in controlling depth of field. Depth of field is the distance between the points in the foreground and the background, and determines how much of the image is in focus.
With aperture, it's opposite day everyday. F-stop numbers are smaller for larger openings (i.e. f/1.4) and larger for smaller openings (i.e. f/22). The smaller the opening, the less light that hits the sensor but the more that is in focus, the deeper the depth-of-field. The larger the opening, the more light that hits the sensor, but the less that is in focus, and the shallower your depth of field.
For ages, we were confused about where these numbers came from. 1.4 and 2.8 at one side of the scale, and 22 on the other? Who made this stuff up? It seems so random and mathematical, and when we did a little sleuthing, we figured it out. An f-stop is the ratio correlated with the size of the opening of the lens, it’s equal to the focal length of the lens divided by the diameter of the lens. The reason aperture is a bit more confusing than ISO and shutter speed is because it works in what seems to be arbitrary fractions. But these fractions were created in order to make sure each ‘stop’ of light was in keeping with the ‘stops’ of light that ISO and shutter speed afford.
To get your head around why large f-stop numbers represent tiny little openings and small f-stop numbers refer to large openings, you have to get into the nitty gritty of dividing the focal length by the diameter, or the focal length by the f-stop. An aperture opening is a fraction of the focal length of your lens. For example, on a 100mm lens, f/4 means that the aperture opening is 1/4th of 100mm. But before we make your brains explode, it’s probably just easiest at this stage to remember that if you divide the focal length by a small f-stop number, you get a large diameter (which means a bigger area and therefore more light passing through the opening). And if you divide a given focal length by a large f-stop number, the result is a small diameter, letting less light into the camera.
ISO
Film photographers out there, feel free to skim this section! Chances are, you’re already all over it. When shooting film, the first variable you decide on before approaching the other two sides of the exposure triangle is ISO. For those of us more wed to the digital age, here’s a little refresher. Back in the old film touting days, ISO was a measure of how light-sensitive the emulsion on the film was. Today we use the same numbers, but instead of referring to film, we refer to the sensitivity of your light sensor.
The normal range of a digital camera’s ISO is about 100 to 3200. And to risk sounding like your luddite crazy uncle, it’s so hard to keep up with the pace of technological change these days that by the time this guide is published, we wouldn’t be surprised if a new camera was released that could go as low as 25 or as high as a few million.
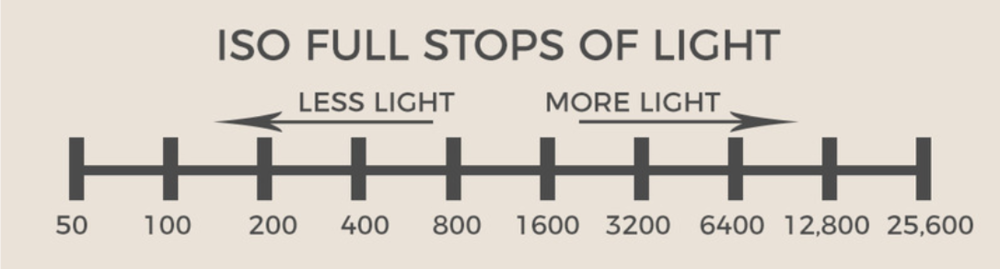
Lower ISO numbers (i.e. 100) are best for brighter lighting scenarios. The lower number connotes a slower ‘film speed,’ and means the sensor is gathering less light data. Higher ISO numbers (i.e. 3200) help to add brightness when shooting in low-light conditions. The higher number connotes a faster ‘film speed’ and means the sensor is gathering more light data to create the exposure. Lower ISOs equate to a finer grain, or smaller pixelation while higher ISOs have a larger grain or heavier visible pixelation (also known as noise).
In an ideal world, we’d just be able to adjust the ISO according to each lighting situation and not have to lug around tripods or flashes or work with anything but natural lighting. But raising your ISO has unfortunate trade-offs. Sometimes it’s necessary, when the other two sides of the exposure triangle are absolutely pushed (your depth of field is as shallow as you’d like it, and the shutter speed can’t be any slower without creating undue blur), but sometimes just pushing your ISO to give you more latitude can render a lot of grain and won’t be usable as anything larger than a thumbnail.
The rule of thumb here is to always shoot at the lowest ISO possible.
At the lowest ISO setting, your images will come out with less noise, more dynamic range, and in better definition. The art of the exposure triangle lies in the way you balance all three variables to get you the shot you want. Sometimes a high ISO is necessary to fight against motion blur, and sometimes you’ll be faced with the challenge of deciding between a sharp photo at a high ISO and a blurry photo at a low ISO. Plagued with indecision at the best of times? Don’t worry, the subjects in front of your lens will give you clues about which choices to make.
If you’re shooting in the sun, but want to capture people frozen in motion (maybe they’re mid-stride, gearing up for a jump into the sunset, or maybe you want to capture that exact moment as the cork flies out of the champagne bottle), you’ll want to have your ISO at a higher value (around 400) so that you can avail of the faster shutter speeds without your image getting too dark. Different situations call for different balances of ISO, shutter speed, and aperture.
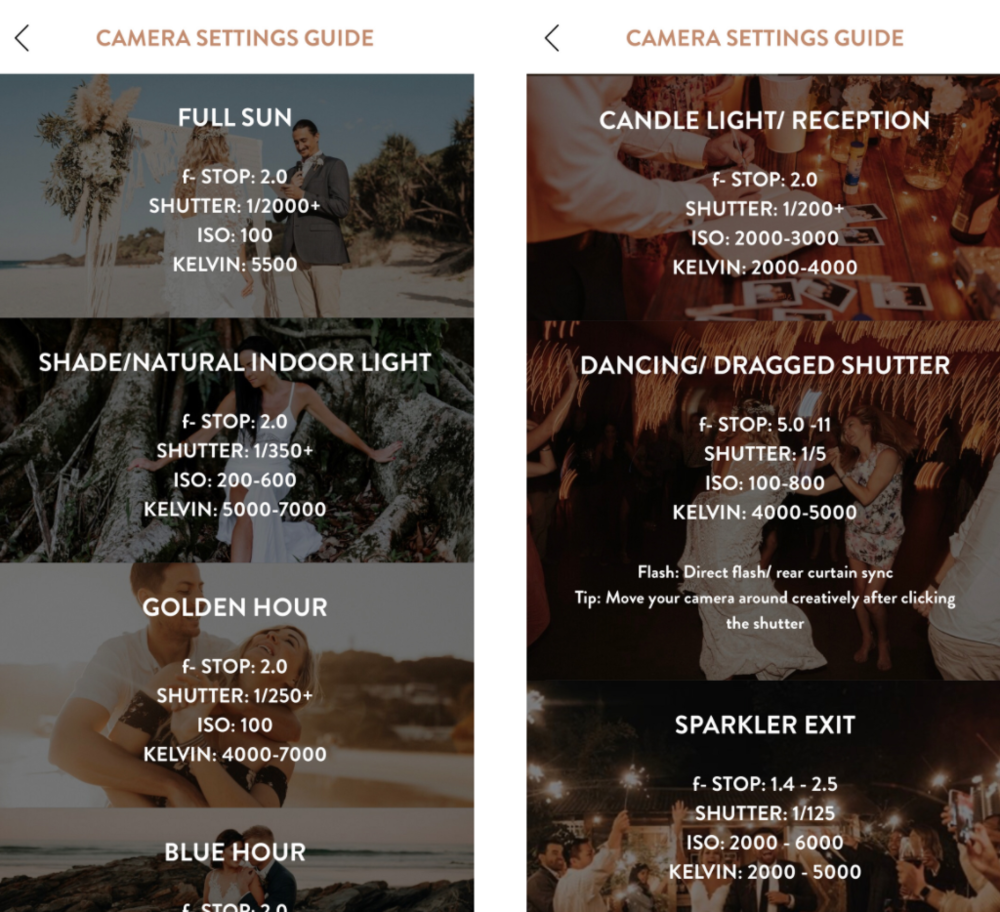
But don’t let choice paralysis stop you from getting out there and shooting your little heart out! We’ve got a nifty little camera settings guide embedded in the app that gives you an at-a-glance tool to help you navigate even the trickiest of lighting scenarios.
Shutter speed
Let’s have a little breather, shall we? Shutter speed is probably one of the easiest components of exposure to explain. There’s a little panel, or shutter, in your camera that opens and closes in order to expose the sensor to the light bouncing into your lens. The length of time that this shutter is open is called the shutter speed. No surprises there! And after the labyrinth that is beginning to understand the nuance of aperture, we’ll take all of the straight and easy answers we can get. Basically, the meat and potatoes of what you need to know is this:
Faster shutter speeds freeze action in a photo, and slower shutter speeds blur moving objects.
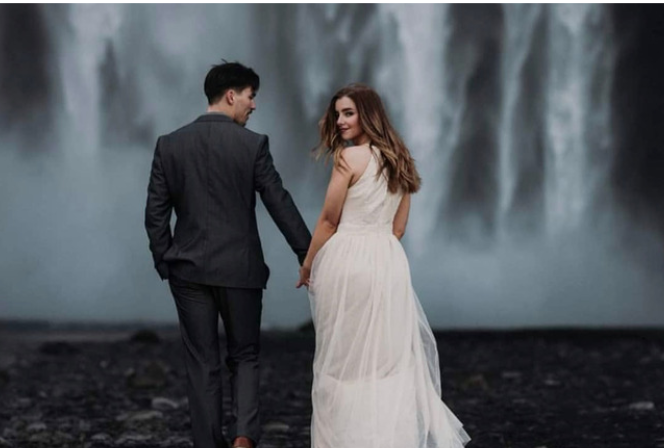
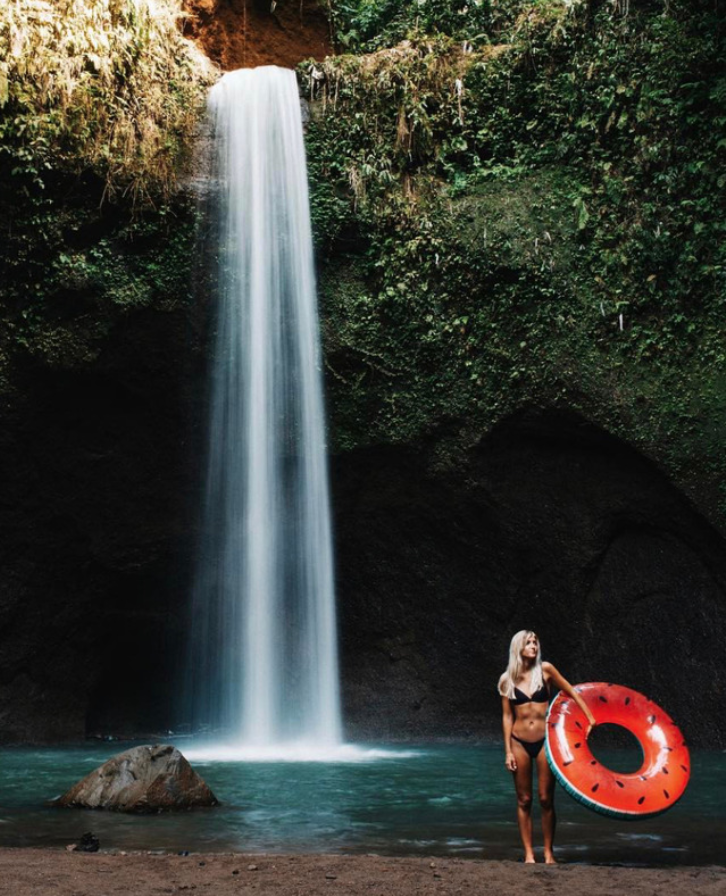
Once you get all that down, you can start to do tricky things like panning the camera with the movement of your subject at a slower shutter speed so that your subject stays in focus and the background motion blurs. Or get your subjects to stand really still in front of a waterfall and let the movement of the water smooth into a blur behind them while they stay in focus.
Kelvin
You may have noticed, nestled somewhere amongst the other standardised settings in the White Balance section of your camera, a little ‘K,’ just sitting pretty. Maybe you’ve dialled into it and been intimidated by the strange square rainbow that pops up onto your screen. We’re here to encourage you not to be intimidated! That ‘K’ is the key to owning the world of colour control.
K stands for Kelvin. In science, Kelvin is a standard of measurement that relates to temperature, directly correlated with the colour of burning carbon. In photography (a strange science in its own right), Kelvin is correlated with the temperature of light. When you shoot in Kelvin you’re taking an active role in dictating the camera’s white balance.
Adjusting kelvins helps your DSLR to do what your brain does automatically. And all you have to do is check our Camera Settings Guide to help you know how to set it.
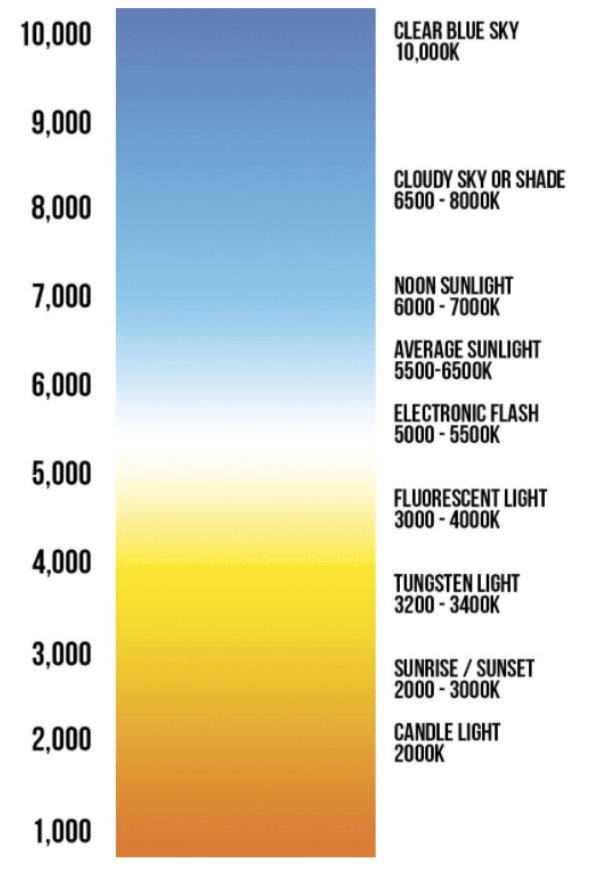
Generally, warmer light temperatures (like candle-lit rooms or golden hour) correlate to a low-temperature heat (~2000 K to ~4500 K), and cooler light temperatures correlate to a high-temperature heat (~6000 K to ~9000 K).
Once you get a feel for it, you’ll be able to fine-tune your settings by eye. Go into your camera settings, and set the temperature based on what you know or see. Experiment, have a little play!
White balance
Here’s a Kelvin scale, just to get you started:
You’ve probably had a little poke around the various preset white balances, and they’re great because they help you find the correct colour temperature depending on the lighting. As with most automated things though, they require a little bit of supervision from the discerning human eye to really function properly.
Maybe your camera has a screen that looks a little bit like this:
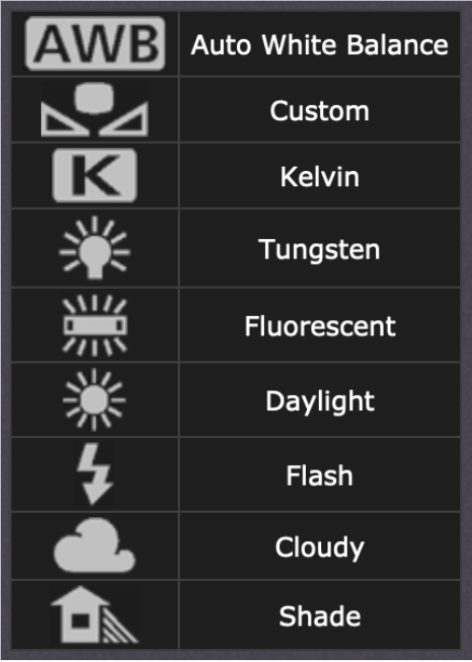
The first three on the list allow for a range of colour temperatures, and as handy as AWB can be, it’s still not quite as honed as our eyes, and sometimes falls short. Everything from Tungsten down is arranged in order of increasing colour temperatures, and is best used as a rough and quick guide to help you get as close as possible to real life. Remember to shoot in RAW so you have a bit more room to play in the post-processing suite.
The best thing about it is there is no true ‘right’ or ‘wrong.’ What tones and temperatures would you like to bring out in your photograph? Play and curiosity will help lead you to a real mastery of the weird world of White Balance.
Once you’ve gotten the hang of these basic camera settings, a whole world of creative control will open up to you. The exposure triangle is your friend! And don’t stress if it feels a little clunky at first. With enough practice you’ll be whizzing through all the bells and whistles of that fancy DSLR in no time, confidently creating great images regardless of any lighting challenges that may emerge!
Let's recap:
- Set your ISO to the lowest value possible.
- Select the aperture setting that will provide your desired depth of field.
- Tip: To mentain focus on multiple subject a great aperture tips is: Min 2.0 for 2ppl, 3.0 for 3ppl, 4.0 for 4ppl
- Faster shutter speed freeze, and slower shutter speed blur
- The bigger the aperture number, the smaller the diameter of the lens.
lead your photography
sessions with confidence.


FAQ's
What is a camera settings guide?
What affects exposure in photography?
Why are camera settings so important?