

Written By: Jacob Loafman from Looks Like Film
We’re all used to seeing examples of double exposure or multiple exposure photography where one fills in the silhouette with a pattern of some kind. It could be plants, trees, water, patterns, etc. They turn out beautiful, right?! You can use this same process to use them in a different way, as well. Let’s look into that.
There are two types of multiple exposures. I’ll be referring to Canon, because that’s what I shoot.
Additive - Filling in the underexposed portion of the first exposure with the following exposure/exposures
Average – Simply combining more than one exposure, overlaying two or more on top of each other
Basically, the way I think about the Additive style multiple exposure is simply adding the light of the second exposure to the dark of the first exposure. I break it down to something simple. Underexposed, silhouette, or any other technical term used, to me, just means DARK. I know that I can add something to the dark portion of the first exposure with the light of the second exposure. A little reminder I use for myself when shooting is, “add to the dark of the first with the light of the second.” So, I always shoot the dark first and the light second. This helps me think of how I can create something a little different than what we’re used to seeing, without being too technical. Light and dark, that’s all that comes to mind. Let’s look at some examples and I’ll walk you through the simple process.
*Since I use Canon, I always compose multiple exposures using the Live View. Yes, Canon makes it very, very easy to create multiple exposures, on the technical side of things. So, that’s just a big bonus.
Additive mode
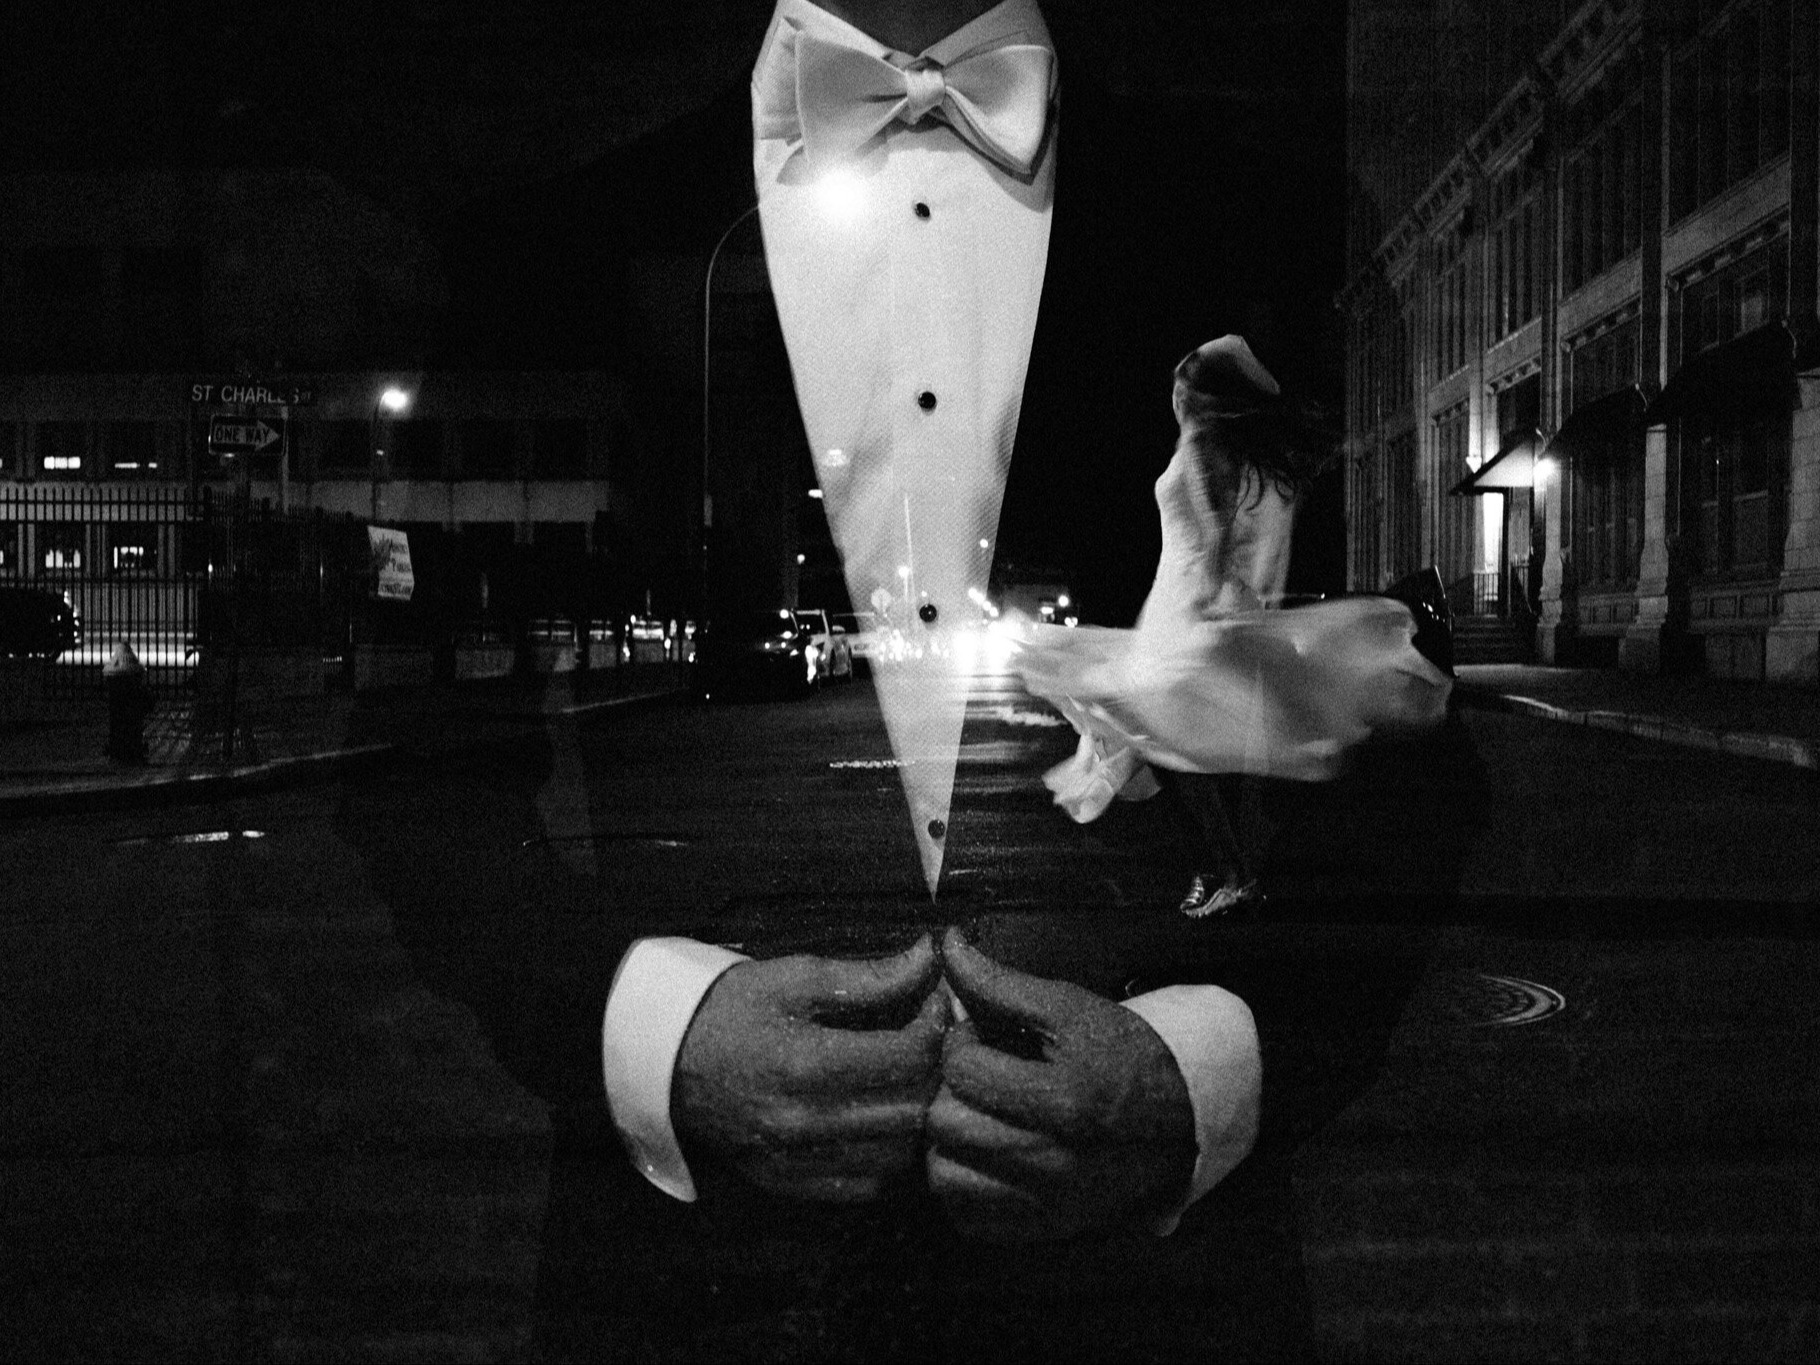
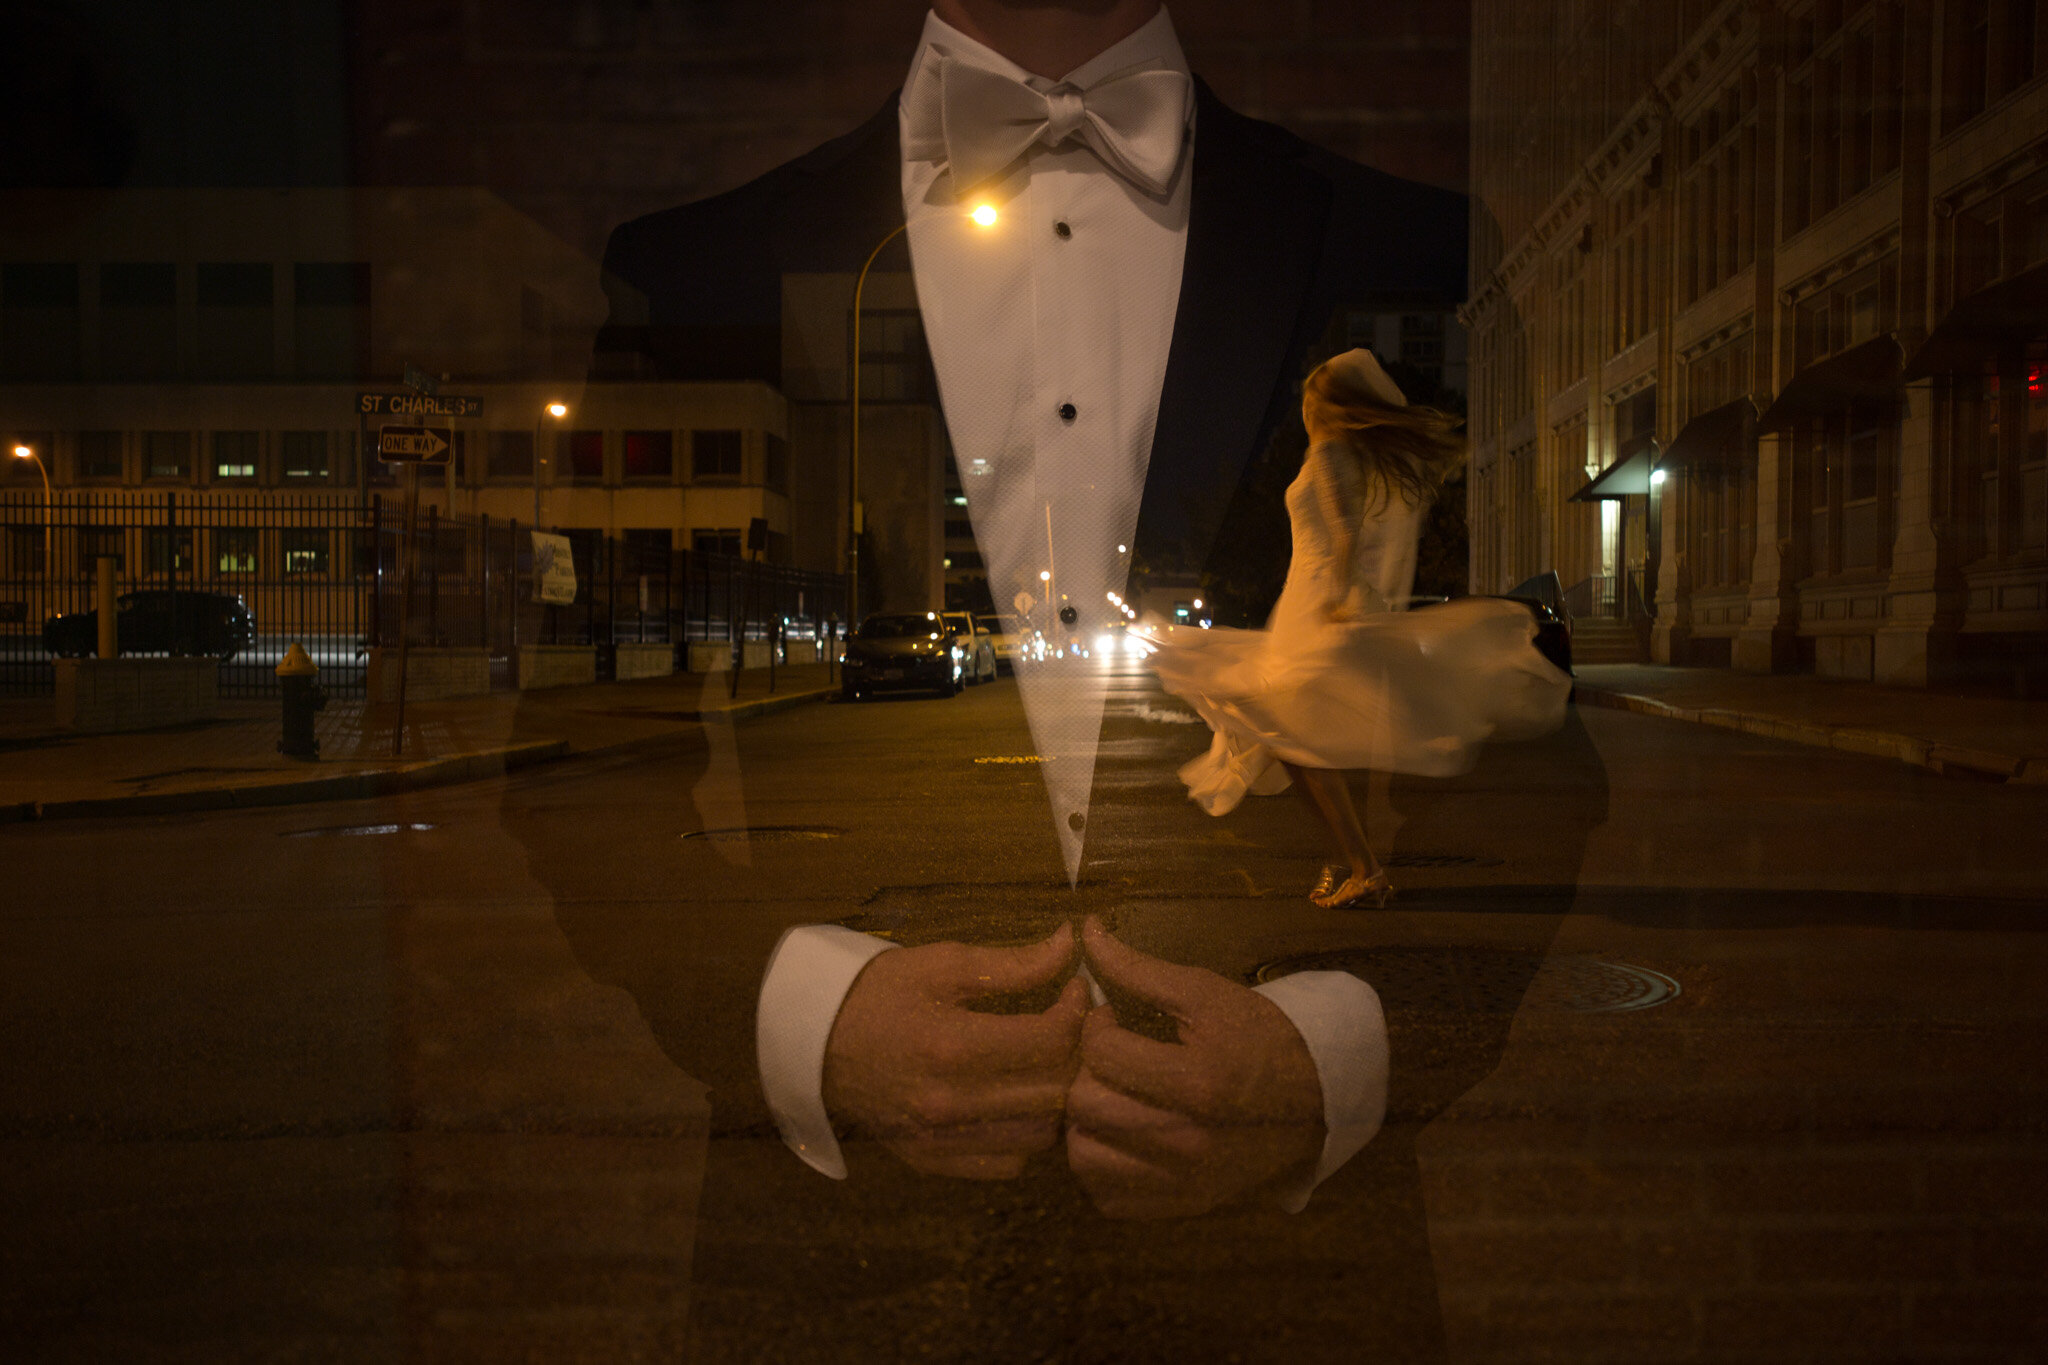
For this photograph, I knew that I could add something to the groom’s tuxedo, as it was black. So, dark, yeah? I need to add something light. The bride’s dress was white, so I decided to add her into his tuxedo where his heart is. The first exposure was the groom standing up against a dark brick wall. His tuxedo was darker than the wall, so it would stand out from the wall a bit. I had the first exposure, now it was time to add the bride. I wanted to create something like a movie poster you see outside the theater. For the second exposure, I asked her to spin in the street and shot it at around 1/30 or so to get the motion blur of her dress moving. I looked at the back of my camera and it turned out better than I imagined! Here is how it looked on the back of my camera:
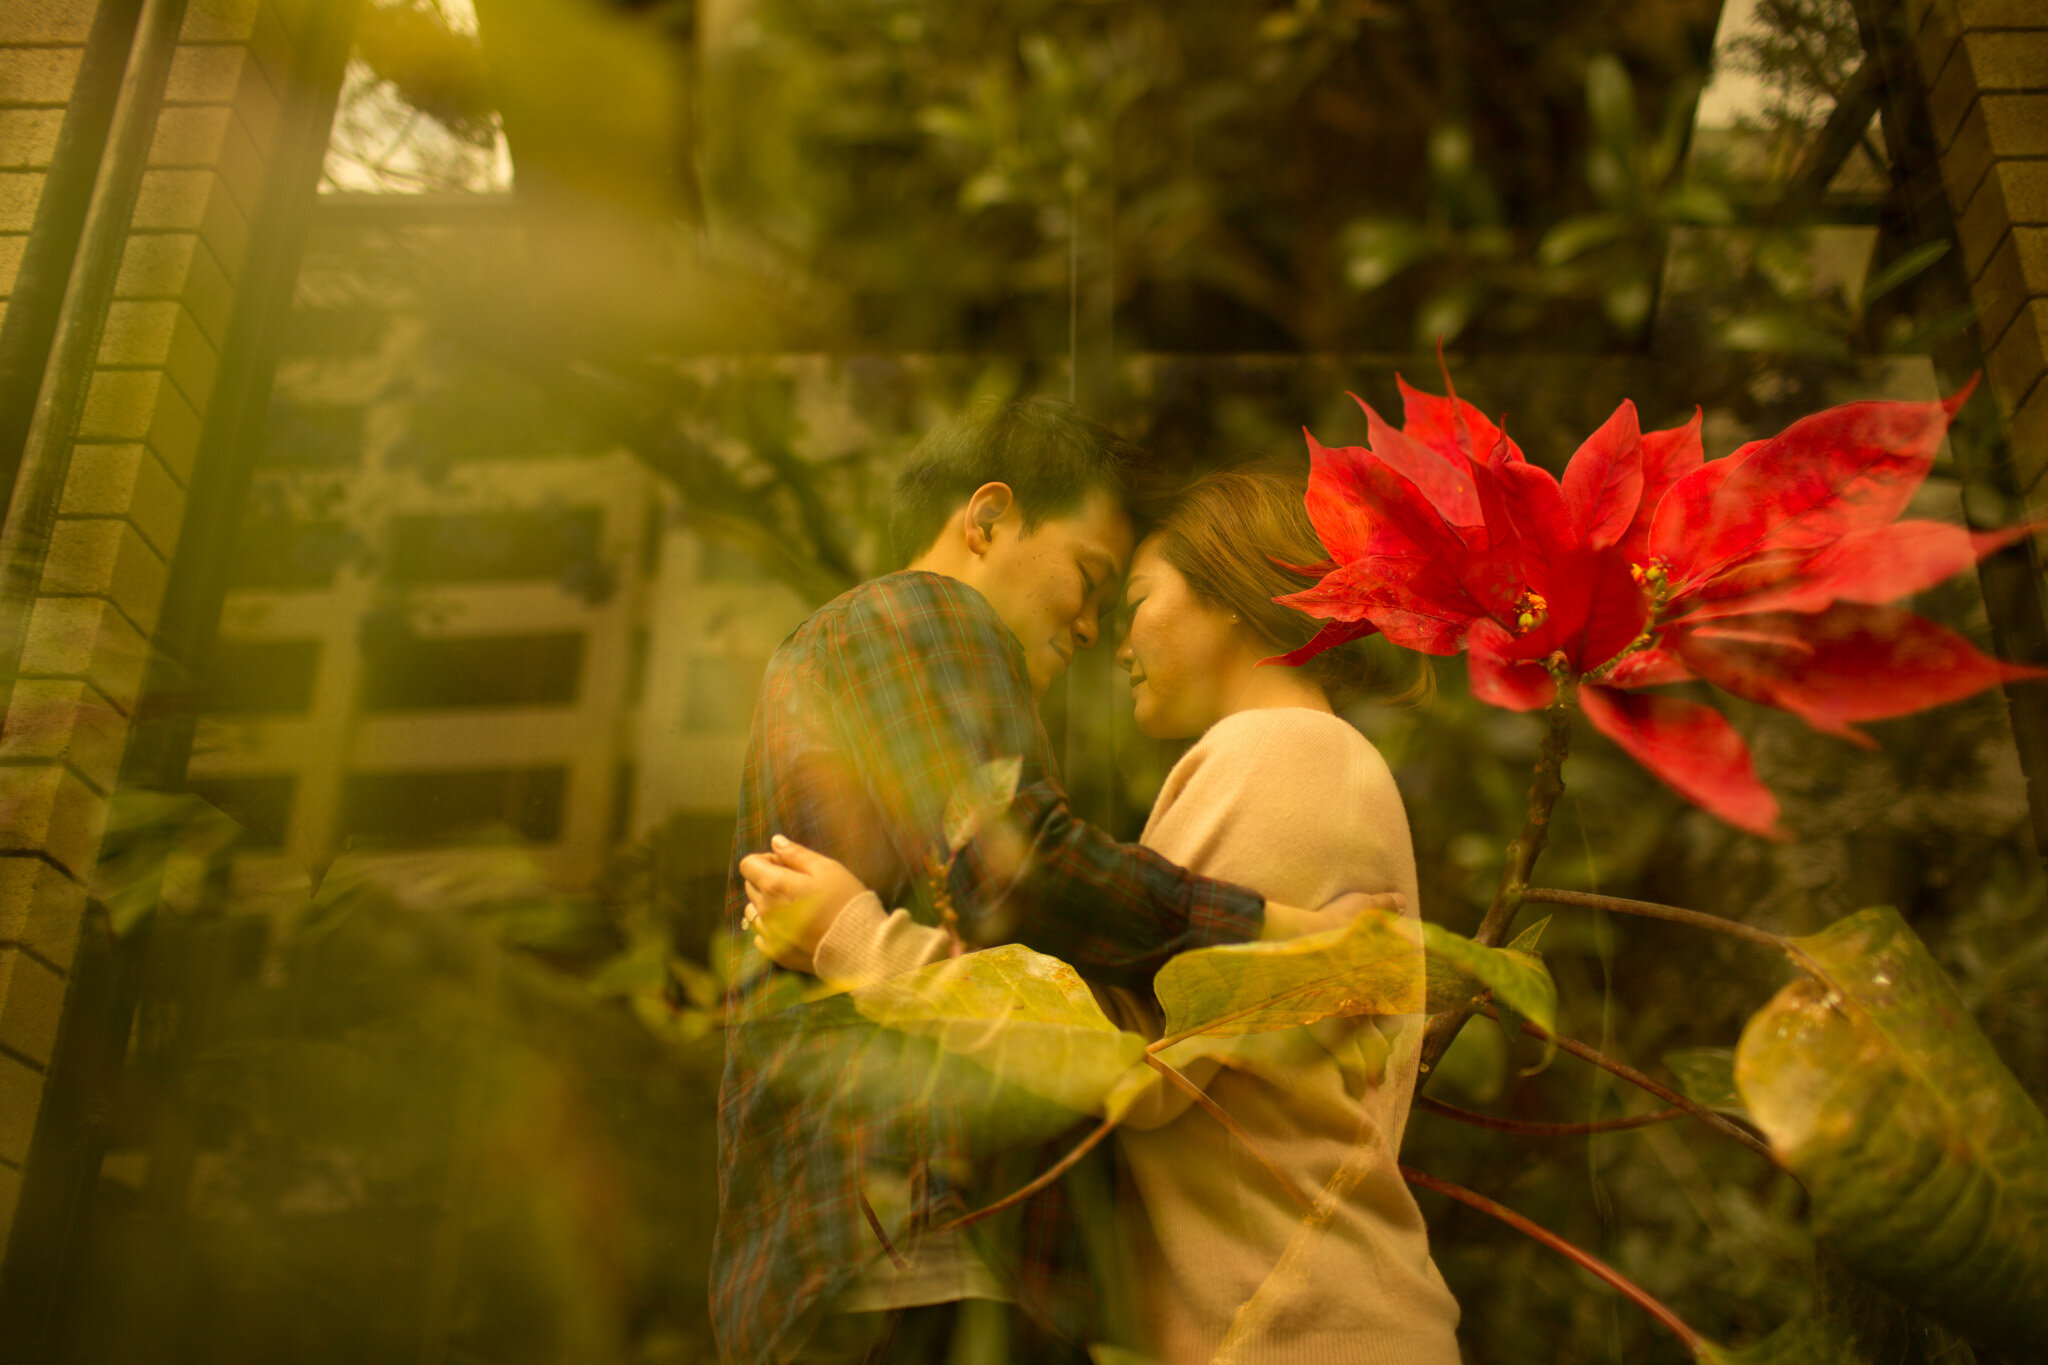
The first example shows how to fill in the dark of a specific thing with another scene, but you can also fill in a dark background with anything you want! Subjects in the middle, exposing for just the highlights, keeping that background super dark, and then filling in that dark with another exposure, which creates an interesting overlay. This is the opposite of filling in a silhouette. In this case, the “silhouette” is the entire background. The subjects are what you expose for. Here is an example of this process:
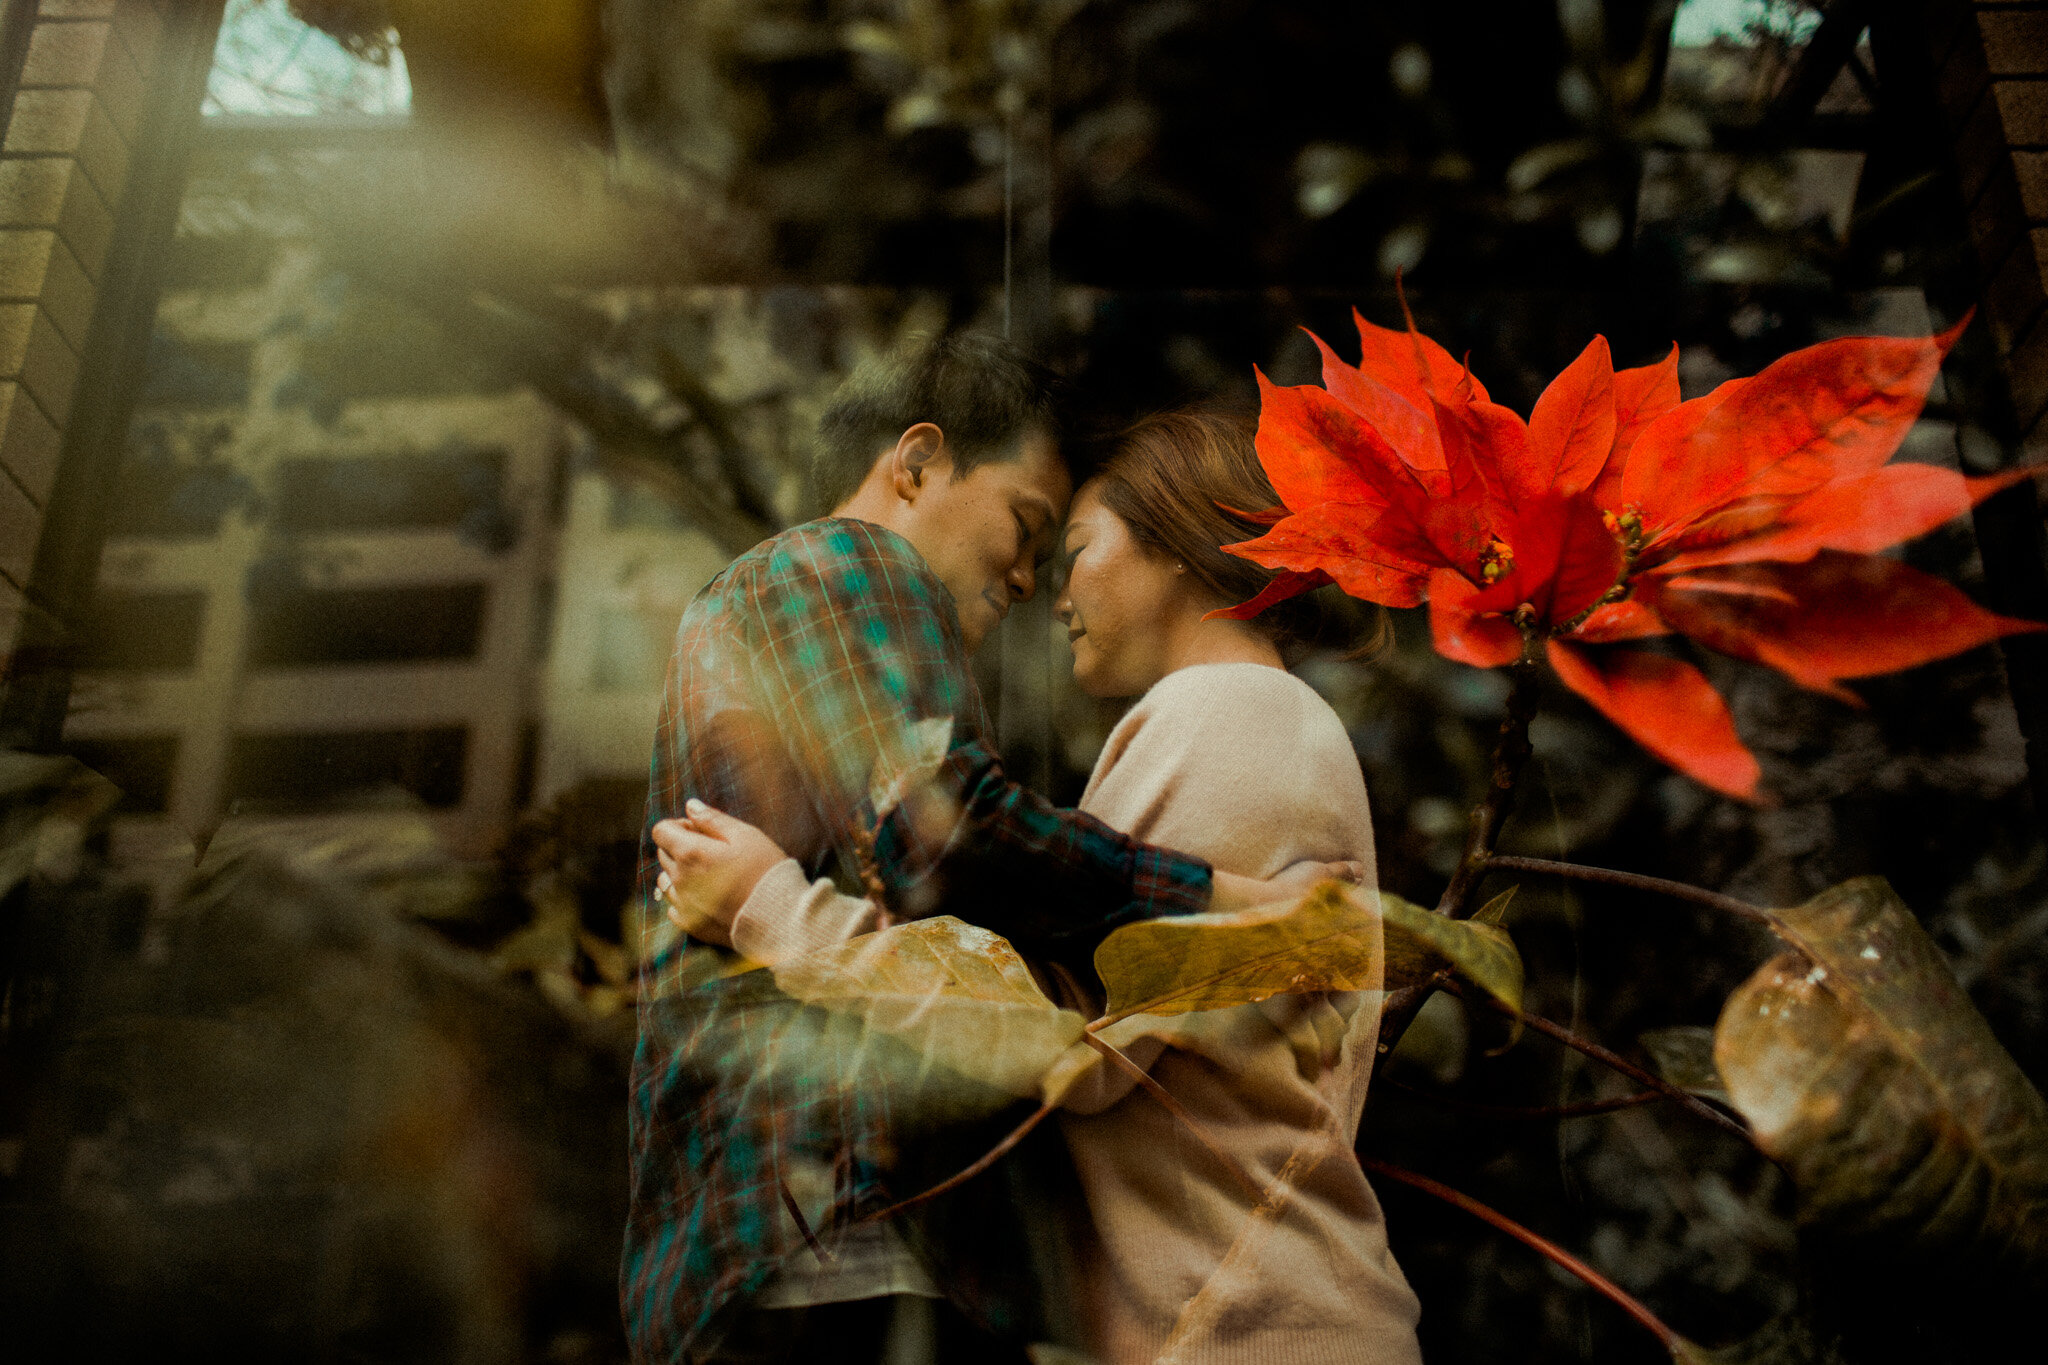
You can see in this photograph how the plants act as the foreground and the background. The subjects almost appear to be of a similar size to the flower! That’s pretty interesting to me, so that’s why I created this one. Here is an example of the first exposure of the subjects against a dark background:
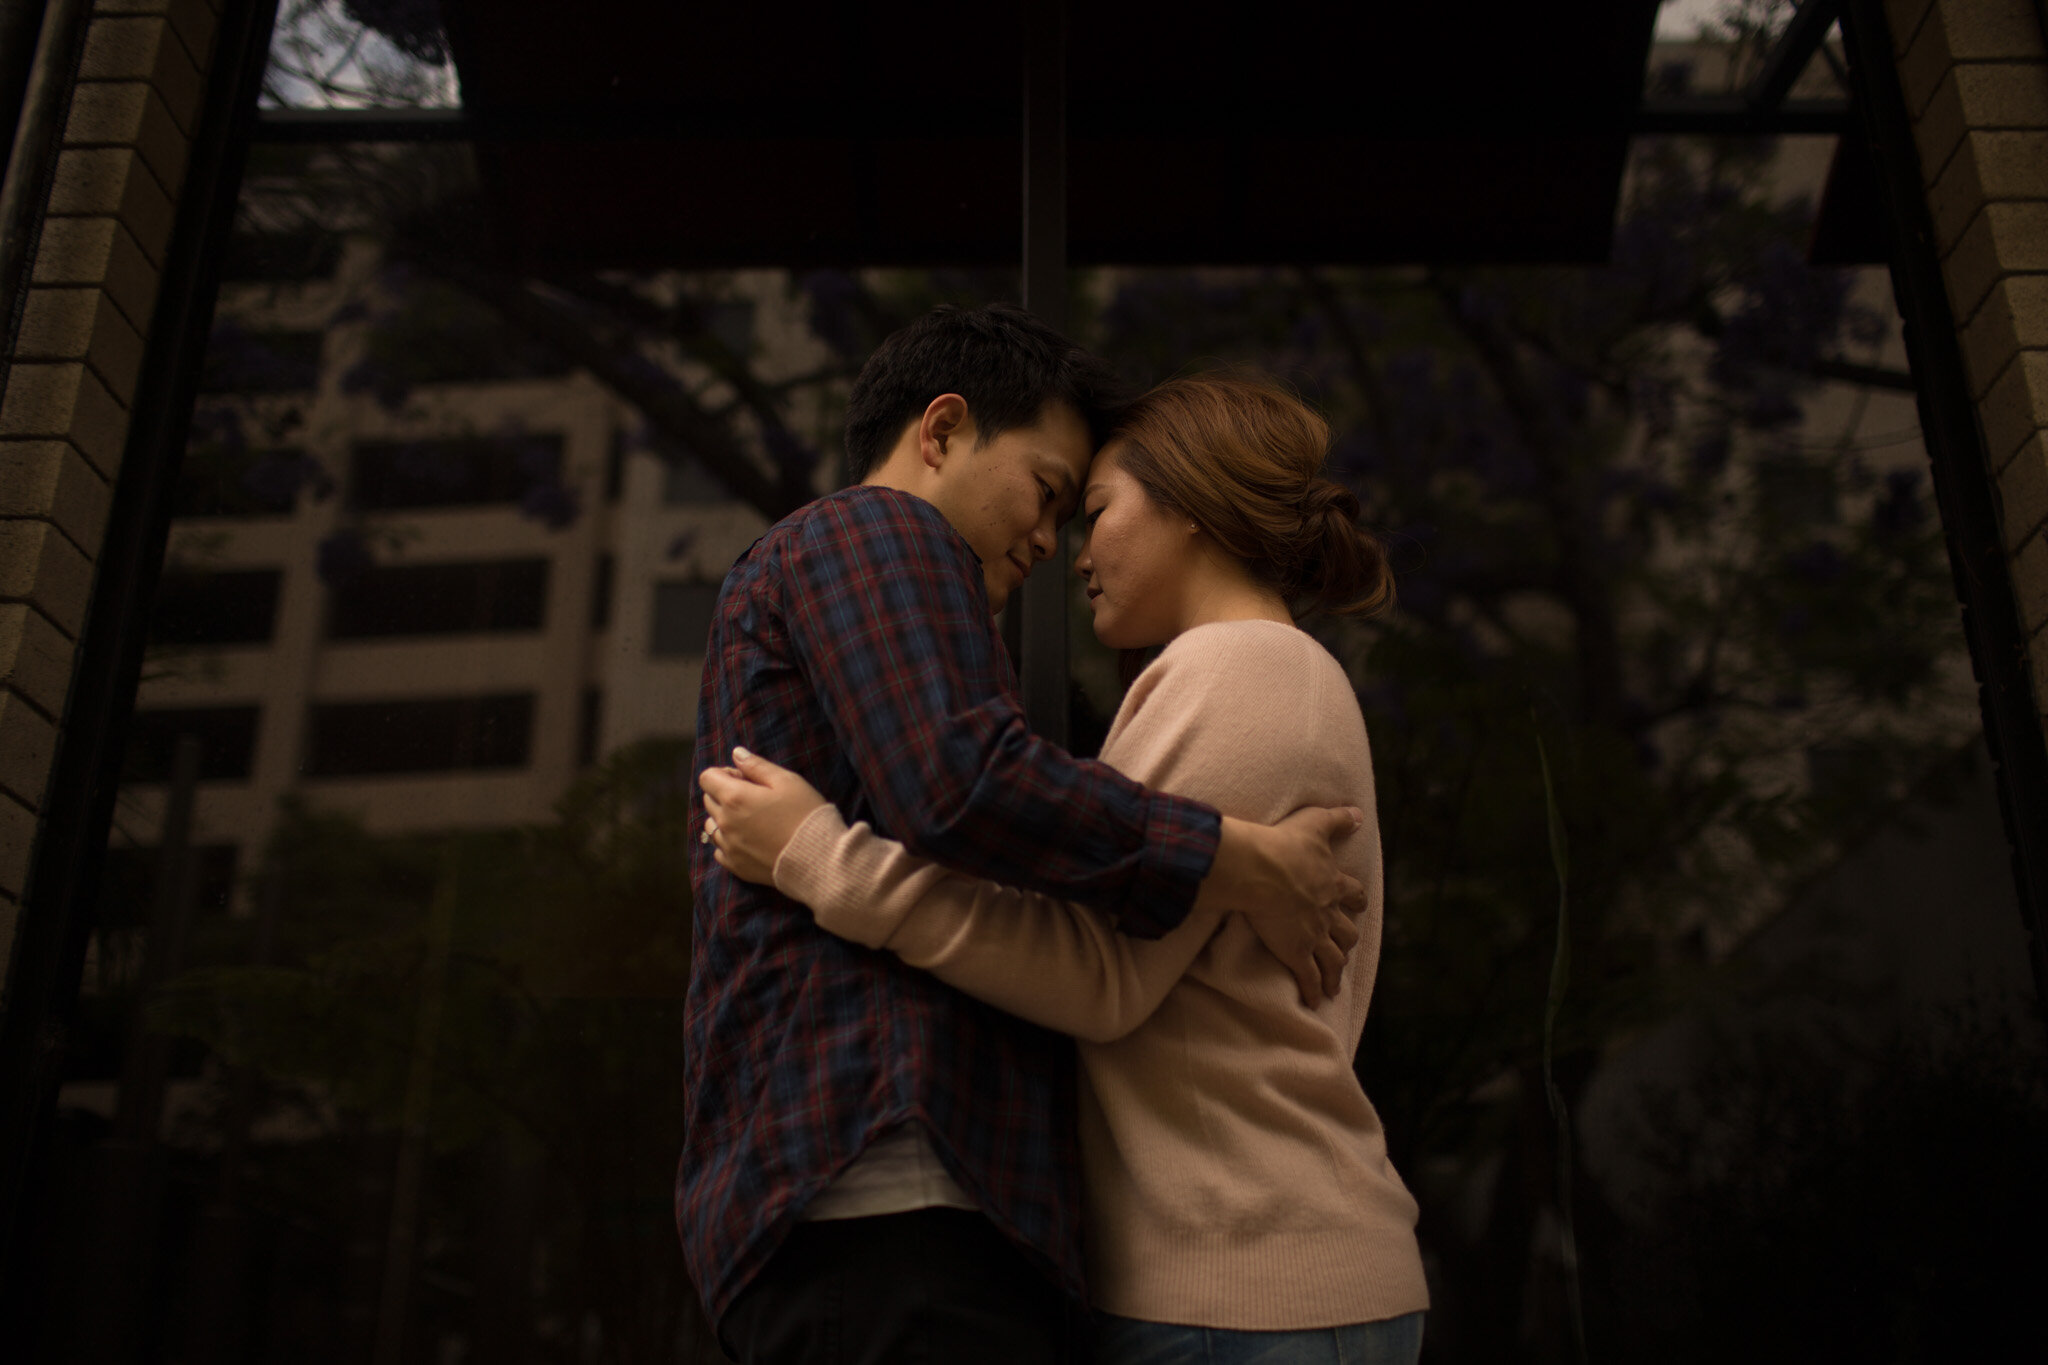
As you can see here, the background was just a couple of dark windows with interesting reflections, which just added more to the multiple exposure in the end. I exposed for the highlights with the first exposure in order to keep the dark background dark. For the second exposure, I simply walked over to a plant in a big pot and composed the shot of the plant/flower using Live View. Here is how it turned out on the back of my camera:
For the final example of this method, I wanted to show how you can almost weld highlights together using the Additive mode. Here is an example of what I’m referring to when I say weld:
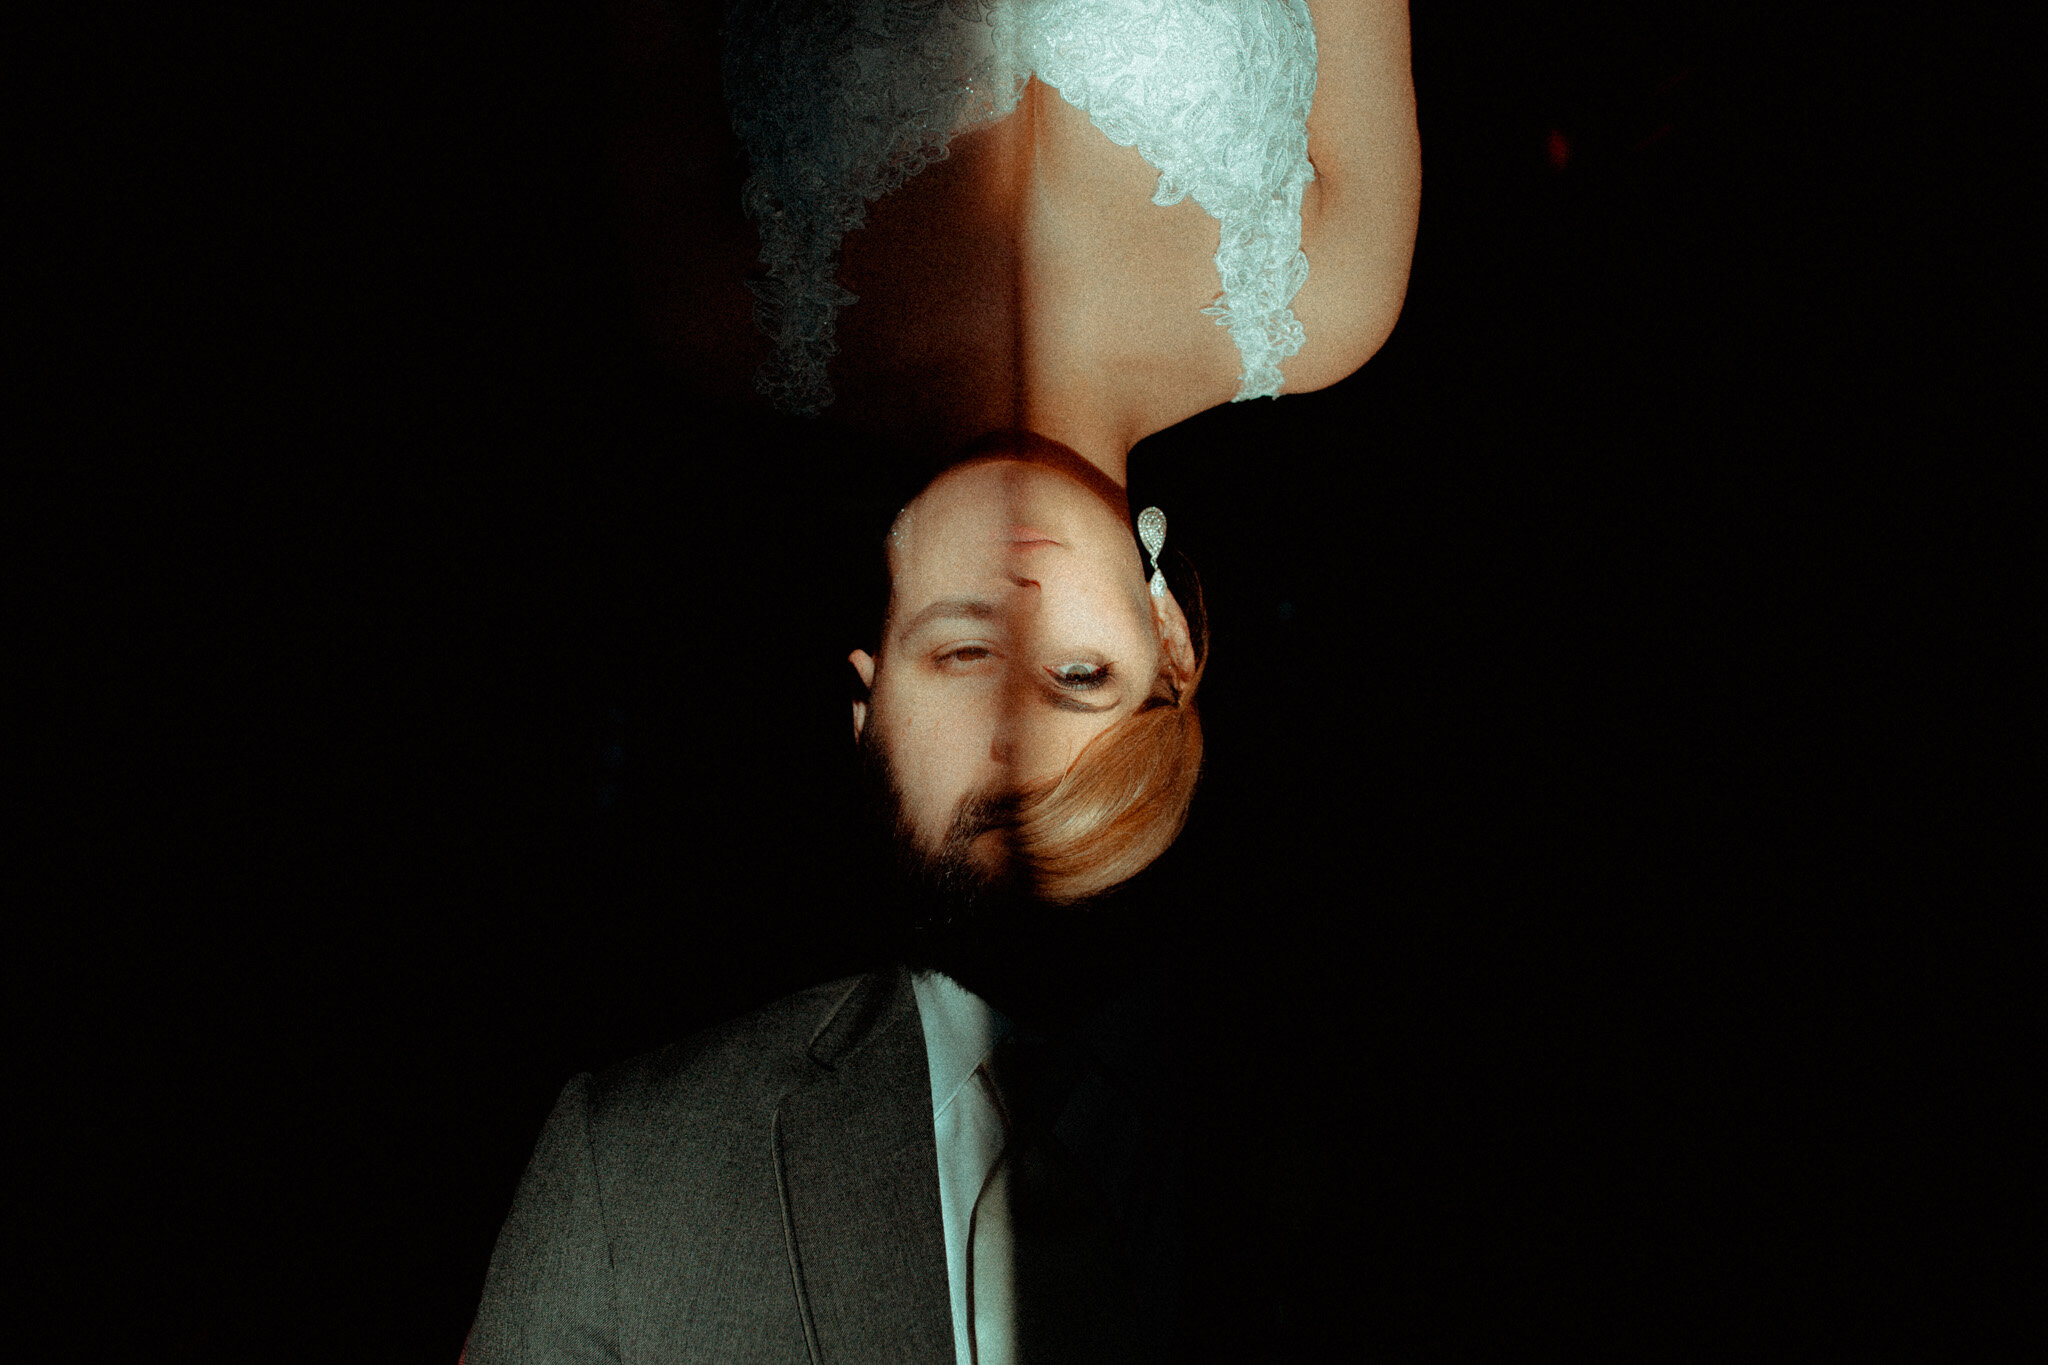
We were making some portraits behind a stage at the reception venue of this wedding and I saw a little slice of light coming through the window. That magical light! I was taking single portraits of the groom splitting his face in half with this slice of light. Then I told myself that little reminder that I use quite often, “add light to the dark of the first with the second.” Only this time, I took it another route and knew that I could possibly merge the highlights together if I shot the bride and groom using that light to split their faces in half. For the first exposure, I shot the groom exposing for just the highlights. That exposure was done. His face was split in half and the split was lined up in the center of the frame. Now onto the second exposure. For the second exposure, I flipped my camera upside down, lined up her face with his, again using Live View for the preview, exposed for the highlights, and BOOM! Their faces were merged or welded together! In post processing, I did some simple cloning to remove other highlight blips in the scene that were distracting to me.
Average mode
Average mode is even simpler, because with this mode, you are just combining photos! A basic overlay of exposures. So, I just need to create something interesting for the viewer. This is where you can put a person inside of themselves at different sizes, which is definitely interesting to look at. You can also use this method to layer up elements of interest, which I’ll also show an example of. Let’s take a look at the person inside of themselves first, though. Here is an example of this idea:

This idea is quite simple, really! For the first exposure, I got close to the subject and took a photo of her shoulders up. Again, using Live View preview for composing, for the second exposure, I simply took some steps backwards making the subject smaller in the frame. I kept stepping back until her head in this exposure lined up just below her chin in the first exposure. The second exposure was taken. I then took a third exposure to add even a smaller shot of the subject in the frame. I just repeated step two above and took some steps back. You can just barely see the third exposure of the subject holding the blanket tightly. It’s subtle, but works for me. It reminds me of those little toy statues that you keep finding smaller toys inside of the shell of the larger ones and you keep opening and opening shells to reveal more toys.
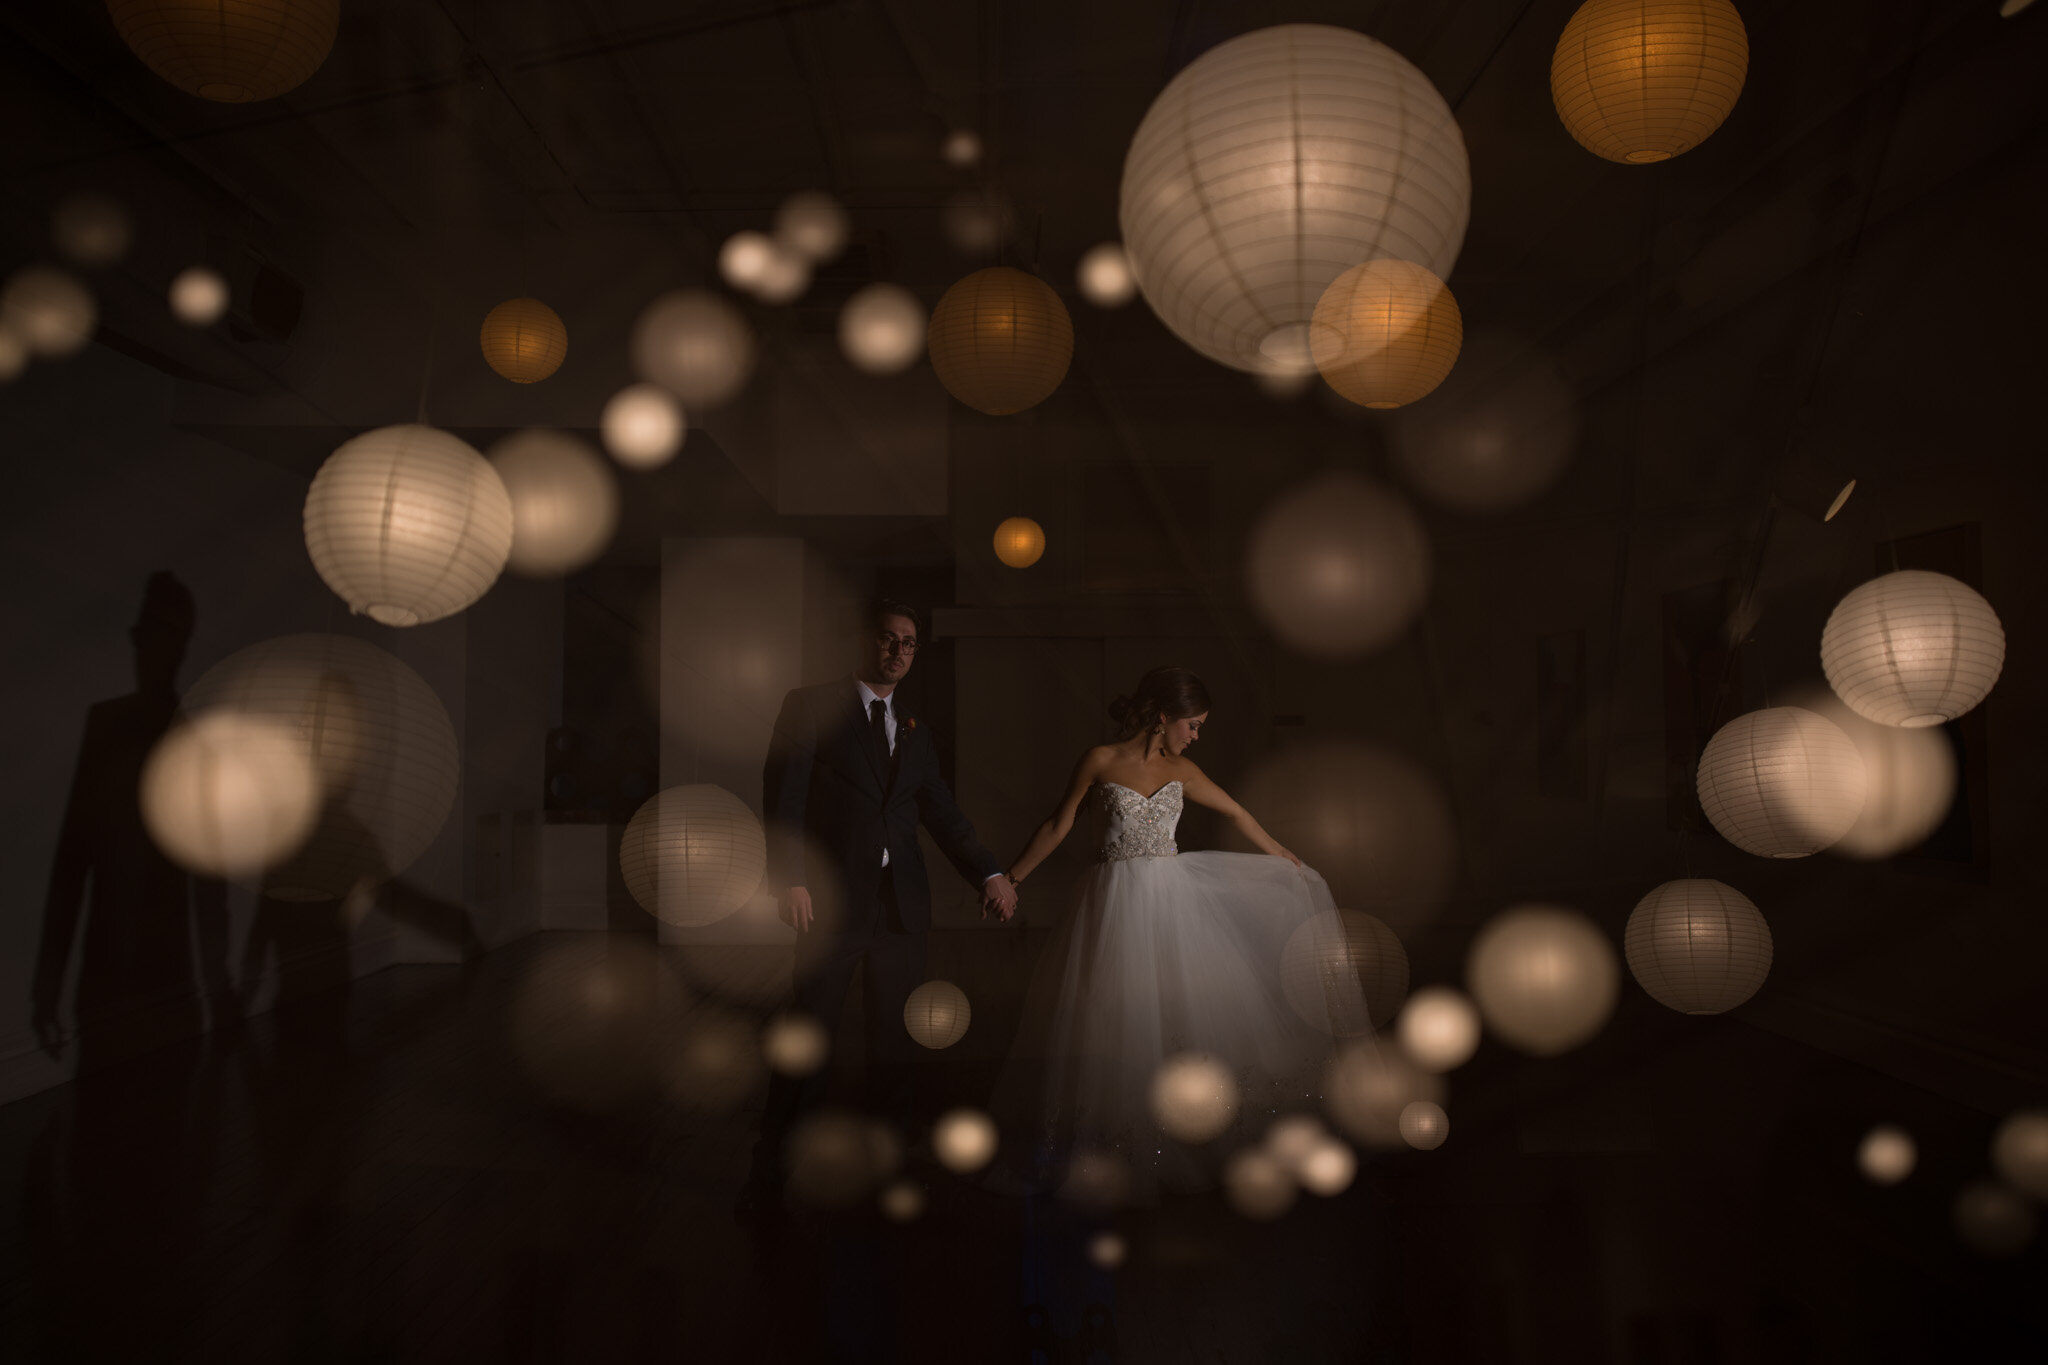
The other way I’ve used the Average mode, is to layer ONLY highlights in a single frame. This photograph is one of my more well-known multiple exposures that I’ve made. I used the Average mode here to layer the lanterns with the subjects. Here is the edited photograph:
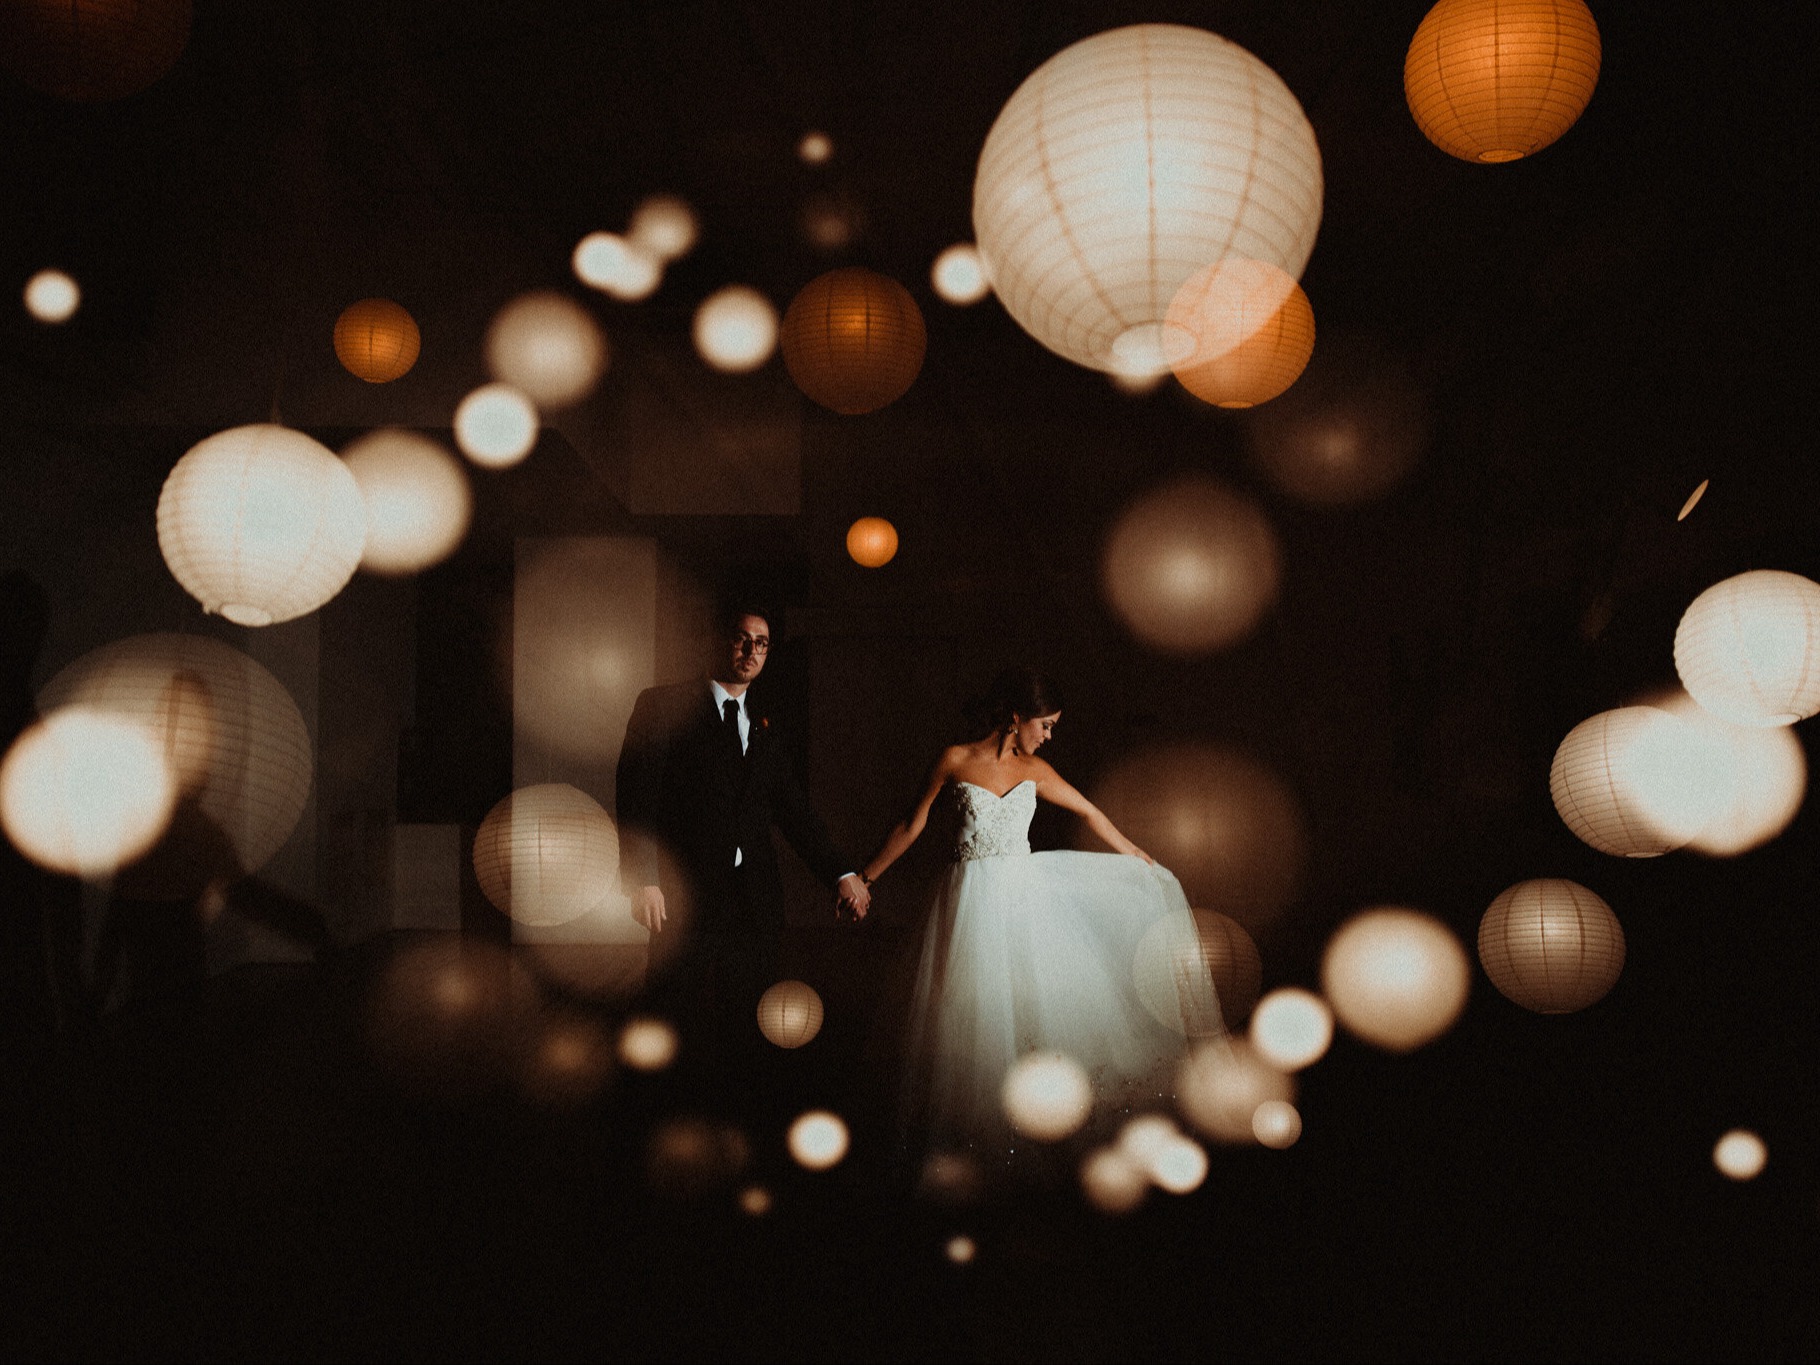
This photograph is actually FOUR exposures layered together. I only wanted to layer the highlights, so I needed deep shadows. That called for a flash to be used on the subjects, to keep the shadows deep behind them. First, I’ll describe the location for you. This was in a very minimal, simple art gallery. It was small, but had decent sized rooms with these paper lanterns hanging from the ceilings. The bridesmaids were getting ready earlier in the day in this specific room and I noticed the lanterns were pretty interesting. I took a double exposure of them getting ready as a test shot. The first exposure was just the bridesmaids doing hair and makeup with the lanterns above them. The second exposure I flipped the camera upside down and exposed for just the highlights of the lanterns. It was like they were sandwiched between these interesting spheres of light. I had the idea in my mind to try at night, when the lanterns were lit up to full blast. Let’s walk through each exposure of the final result above.
For the first exposure, I placed the subjects in the middle of the room, and set up my off-camera flash on a light stand at a 45 degree angle from the subjects. The flash was just off to the right of the frame when you’re viewing the photograph. I set it at this angle, because I wanted the light to just brush in front of them at an angle, to make sure they’re lit properly, but keeping the shadows pretty dark at the same time. I took a look at the back of my camera, and they were lit so great! So, I told them to head back down to the dance floor to party, and I proceeded with the next exposures.
I knew I wanted to create something a bit magical, and since I had already decided on 4 total exposures, I had 3 left to shoot. These lanterns were interesting, but how could I take it to another level? While I was preparing for the second exposure, I looked at the back of my camera and noticed I turned my focus ring a bit, and the lanterns were out of focus. Now, I had these beautiful bokeh spheres! I decided to layer these into the composition.
For the second exposure, I turned off my flash and trigger, as I only need to expose for the light of the lanterns, so more light was not needed. I exposed normally for the lanterns on the ceiling, and kept the lanterns in focus for the shot, and really angled my camera up to push the lanterns down to the bottom of the frame.
For the third exposure, I threw the lanterns out of focus, and flipped my camera upside down. This created two things. Firstly, I now had an interesting play on depth perception. Most of the lanterns were now in focus from the first two exposures, but now there were some that were really out of focus. It just played with your eye, and therefore, your brain. Secondly, I now have an interesting diamond shape with the subjects right in the middle of the created shape! Cool!
For the fourth and final exposure, I took a normal shot of the lanterns on the ceiling completely out of focus to create 2 layers of lanterns in focus and 2 layers of lanterns out of focus.
What resulted was beautiful to me. The subjects were now in the middle of this crazy galaxy of lanterns that played with your mind a bit! There was so much interest in one photograph. Here is what I saw on the back of my camera:
So, what does all of this mean? It means you can do SO MANY THINGS with multiple exposures! It’s all about layering elements to create an interesting visual piece of work. You can obviously do this with a single exposure, but having the multiple exposure option broadens your opportunities to a whole new level! Like anything in a creative field, IT’S ALL ABOUT THE TRYING. It’s always about trying new things and not being afraid to experiment with what you have to work with! The world is an amazing place, and with multiple exposures, you could possibly create a little world of your own.
Written by: Jacob Loafman from Looks Like Film

coffee a week. Use code:
lead your photography
sessions with confidence.


FAQ's
What is a multiple exposure in photography, and how does it differ from a single exposure?
What are the creative possibilities and benefits of using multiple exposures in photography?
What equipment and settings are necessary for creating multiple exposures in photography?
Are there any tips for mastering multiple exposures in photography?